Yes, I just Copy and pasted this from
here, and it was really fun to see these! Thought they would bring a good laugh! Will I follow most of them? No, probably not. Seriously...who is going to leave the house with bunny ears on? Not this gal! But more power to ya if you can pull it off! Also, please check out a previous post
HERE about great, CLASSIC fashion for any body type!
Spring/Summer 2010 Clothes: Key Looks
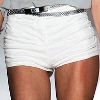
If ever there was a time to hit the gym, it's this Spring. Hemlines have crept up to shorter than short; in fact reaching the negative. Hot pants, boy shorts, and tap pants are all variations on this shorter-than-short style, which in many cases reveal more than just one's legs. Click to read more about the
hot pants trend.

Knee high socks - as well as over-the-knee and thigh high socks - are back as a trend, and the options on how to wear them are many. From the sporty to the sparkly, to layerings of socks over tights; a great pair of socks can add volumes to an outfit. Click to read more about the
knee high socks trend and how to wear it.

The military and tribal trends collide to become this fierce fashion trend. Ancient civilisations come to life in leather tunics, metal plating, and war paint. Unequivocally fearless and with room for endless creativity, the main criteria for the modern warrior is confidence. Click to read more about the
warrior trend.
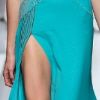
How to pull off the ultimate in sexy without reaching for the micro-mini? Add a long dress with a high split to your Spring wardrobe. From Versace's knock-out gowns to Lanvin's elegantly draping numbers, we look at numerous ways to rock a high dress split. Click to read more about the
high dress splits trend.
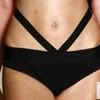
Find out what swimwear you'll be wearing when you hit the beach this Summer with our
Bikinis 2009/2010 trends guide. Which monikinis should you be wearing? And what style of bikinis? And which designer is making the sexiest, must-have pieces? Click to read more about the hottest
swimwear and bikini styles.

Sportswear takes on a whole new level of cool when it hits trend status in 2010. Football inspirations turn tomboy chic to sexy yet effortless looks; while Bond girl scuba inspired clothing is the pinnacle of sporty bombshell. Dance and 20s inspired tennis looks also feature in our comprehensive look at sporty clothing in 2010. Click for more on
sportswear fashion.
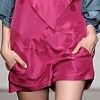
Every so often, one-piece styles of clothing have a revival. What started with bodysuits and leotards is now becoming a fully-fledged trend towards jumpsuits, playsuits, and rompers. As a unique style for Spring 2010, they won't be for everyone, but they will offer more options than you'd think. Click to read more about the
jumpsuits and playsuits trend.

No longer must we stick to boring block colours on our lower half, for all varieties of printed pants have made their way onto the Spring runways. Whether floral, striped, abstract, bold or subdued... patterns on pants are giving us new bold wardrobe options for the warmer months. Click to read more about the
printed pants trend.
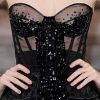
In Spring and Summer fashion tends to get a little more revealing; we blame it on the heat, and one's desire to show off. So in 2009 turn to the
sheer / see-through trend to keep you cool yet sexy. 2009/2010's sheer pieces are a mixture of the soft and feminine, to the opposite extremes of the hardcore sex-kitten. Click for more on the
see-through/sheer/nude fashion trend.

Continuing to be a wardrobe staple for Spring/Summer 2010, the "boyfriend" blazer is a simple way to look chic whether on a fresh Spring day or mild a Summer's night. A slightly oversized jacket or blazer, sleeves rolled up, is the pinnacle of relaxed cool. Click to read more about the
boyfriend blazer trend and how to wear it.

Headbands take a quirky turn with this unique micro-trend. Bunny ears, Mickey Mouse ears, and oversized bows are all styles which fit this vintage-sex-kitten meets sugar sweet girl-next-door look. This trend is a definite favourite for editorials and shoots; but that doesn't mean it can't work on the streets. Click to read more about the
bunny ears trend.
Women's Denim Jean Fashion Trends for Spring/Summer 2010
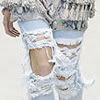
Just when you thought they would never return... ripped jeans are back. Starting in 2008 with a horde of sexed-up editorial shoots and celebrity sightings, those torn denim shorts and shredded jeans are hitting the streets.
Ripped denim in 2009 is certainly sexy and revealing - possibly more than ever. Click here to read more on
the 2009 take on ripped denim.

We've seen jeans go from ripped to torn to downright shredded; so what can you possibly do next? Patch them of course! It's not for everyone, but its an option that's gaining traction. Patched jeans work well as skinnies, or try patched denim flares for a revival of 70s chic. Click to read more about the
patched jeans trend.


